
Easy Mac OS X (Mountain) Lion and Mavericks 10.7, 10.8 and 10.9 Time Machine backup using an Ubuntu Linux server [11.10, 12.04 LTS and up]
Maybe you always wanted to have an Apple Time Capsule for easy backup management of your Macs. One of the drawbacks that comes with a device like that is its price. You could also use any Mac for it, but those are also expensive and most likely don’t wanna be hidden in a dusty closet. If you have an old PC somewhere that can run Linux (or BSD or any other UNIX) you already have everything you need to build a cheap, reliable Time Capsule yourself. Let’s get started!
What you’ll need:
- A PC running Linux (or BSD etc.) as the server
- A Mac (OS X 10.5 and above) that likes to use the Time Machine backup feature
- A hard drive or spare disk space on your server that is at least as big as the Mac’s hard drive
- A fast network to make things smooth
- The latest version of Netatalk (>= v. 2.2.0)
This guide will use Ubuntu Linux as an example as I tested it with Ubuntu Linux 11.10 and 12.04 LTS. The only critical part is that your Netatalk version has to be >= 2.2.0 beta 4, else it won’t work with Lion. Aside from that pre-requisite you can use any Linux/UNIX/BSD/… distribution you want. On the client side, every version since Mac OS X Leopard (10.5) will work. And yes, that includes Lion, Mountain Lion and the newest Mavericks!
[Step 0. Optional, but recommended]
If you are using Ubuntu 11.10 or earlier, add this ppa repository to easily install and update Netatalk to one of the most current versions:
sudo add-apt-repository ppa:jstrunk-math/ppa
If you tried to set up a Time Machine / Netatalk installation before and didn’t succeed, completely remove Netatalk and all of its configuration files before you proceed:
sudo apt-get remove --purge netatalk
There is also no need for any additional Avahi setup since Netatalk 2.2.x comes with built-in Avahi/Bonjour/Zeroconf capabilities in case you were wondering.
Step 1: Install Netatalk
Log in to your server by SSH or open up a shell on it locally. To install Netatalk, type:
sudo apt-get install netatalk
Ok, first step: done!
Step 2: Configure the afpd server
Edit /etc/netatalk/afpd.conf with your favorite editor and add the following line at the end (comment out every other line that might be active):
- -tcp -noddp -uamlist uams_dhx.so,uams_dhx2_passwd.so -nosavepassword
This will define the afpd server (Netatalk).
Due to a bug in Ubuntu 11.10’s Netatalk version you have to use uams_dhx2_passwd.so instead of the usual uams_dhx2.so as the authentication module. If your are using Ubuntu 12.04 or later you can use either module (my reader Brandon mentioned that uams_dhx2_passwd.so might still be needed in 12.10).
Next make sure your /etc/default/netatalk file shows CNID_METAD_RUN=yes. This will ensure that all the metadata that is needed by OS X is handled and saved by an extra daemon on the side, too.
Step 3: Create and prepare the Time Machine backup locations
First of all you should decide which directories you would like to share with your Macs and where you want to save your Time Machine backups. And which user on your server shall be in charge of which backup and directory etc. Here’s an example setup with one user called username (how creative):
cd /home/username/
mkdir tm_backup
Creating the backup directory in his home directory ensures that he has the necessary rights to read and write in it. If you want to keep the backups somewhere else, say on an external hard drive, make sure that the user has the correct rights to access it fully! Here’s another example:
cd /media/backup_hdd/
sudo mkdir tm_backup
sudo chown -R username:username tm_backup
If you want be really fancy and have a single directory for all backups of all your Macs and users, create a group for the Time Machine users:
sudo groupadd tmusers
sudo usermod -a -G tmusers username
cd /media/backup_hdd/
sudo mkdir tm_backup
sudo chown -R username:tmusers tm_backup
sudo chmod 770 -R tm_backup
This will add a new group called tmusers to your systems, add the existing user username to it, create the backup directory and ensure that the owner username and the group tmusers have full access to it. However, it is also possible to skip this step and just use a single user on the server for all the Time Machine backups. Always keep in mind that the backups might be accessible by the other users if they’re all saved to a common directory. Creating a directory and a share for each user separately is the safest method.
Step 4: Configure the shared directory in Netatalk’s config
Now that we have the actual directory set up in the file system we can add the following line to the /etc/netatalk/AppleVolumes.default file:
/media/backup_hdd/tm_backup "Backup for username" allow:username cnidscheme:dbd volsizelimit:200000 options:usedots,upriv,tm
Adjust the location of the directory and the username to your needs. The example above also limits the size shown to OS X as 200 GB (the number is given in MiB, so it’s 200,000 times 1024 in the real world). Also note that the tm option is only option separating a Time Machine capable directory from a regular afp share.
Add a line like this for every user and directory that is supposed to make Time Machine backups. If you want to allow a whole group of users to access a directory for the purpose of Time Machine backups, use this line and make sure to edit the @tmusers option to be @yourgroupname (notice the @ in front of the group name).
/media/backup_hdd/tm_backup "Backup for all users" allow:@tmusers cnidscheme:dbd volsizelimit:1000000 options:usedots,upriv,tm
I made an adjustment to the volsizelimit option since 200 GB might not be enough to backup multiple Macs.
I also added the following line at the beginning of my /etc/netatalk/AppleVolumes.default file:
:DEFAULT: cnidscheme:dbd options:upriv,usedots
This adds some useful default settings when handling more than just a backup share. Just fyi.
Restart the Netatalk daemon to make sure it uses the newly adjusted configurations:
sudo service netatalk restart
We are now done configuring the server. Congratulations! Continue on the client side.
Step 5: Configure the Macs to use the server as a Time Machine volume
Open up a terminal on your Mac (press Command + Space, then enter Terminal and hit Enter) and allow unsupported network volumes to be used as a Time Machine backup destination:
defaults write com.apple.systempreferences TMShowUnsupportedNetworkVolumes 1
Note: run this command as the user that is going to actually make the backup, don’t put sudo in front of the command!
That is all for the command line work. From here on we can use the Mac OS X GUI to continue setting up the Time Machine backup.
Before you do anything else, restart your Mac. Trust me on that one, for some reason it didn’t work for me until I restarted my Mac. Save yourself some time and trouble.
After a fresh boot open up Finder and press Command + K to bring up the “Connect to Server” dialog.
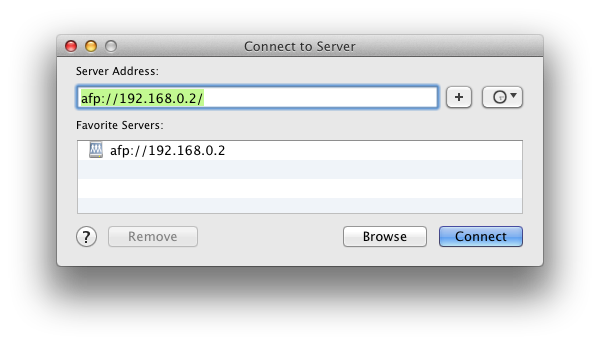
Enter afp://ip_address_of_your_server, press Enter and select the according share from the list. Fill in username and password from the user on the server (not the one on the Mac) and see if you have access to the share. If everything works well, continue with the Time Machine preferences.
In the system preferences on your Mac, select Time Machine and click on “Select Disk…”
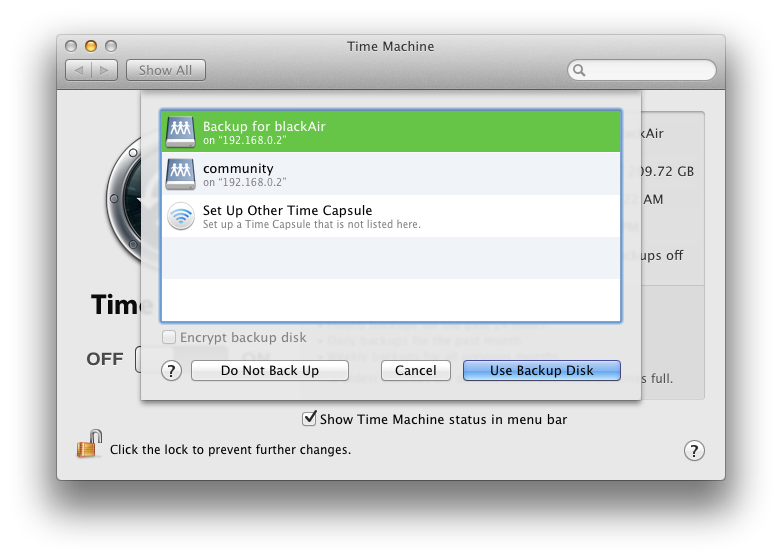
Select your share from the list, edit the other options like excluded directories and automatic backups to your liking and enjoy this cheap and reliable Time Machine solution! The first backup might take quite some time, depending on your network and hard drive speed. All the following backups will be incremental and a lot faster.
Bonus: you don’t even have to manually connect to the server share before a backup. Time Machine will let its magic happen and auto-mount / un-mount the share whenever it is needed. Peace of mind in a box.
P.S.: You can even use this share and setup to easily restore your Mac from scratch after it has crashed or caught fire.
Here are some useful in-depth links for further reading: